Stay Informed with Tableau Data Alerts

When crucial data benchmarks are met within your organization, automated data-driven notifications are dispatched to designated individuals. These data alerts can be conveyed via email or through notifications within your Tableau platform or connected Slack workspace, utilizing the Tableau for Slack application. It is possible to configure data-driven alerts specifically for dashboards and views, excluding story points.
To ensure timely updates, employ relative date filters for time-based charts, enabling recipients to automatically receive alerts as new data emerges. If you lack ownership of the content, kindly request the author to implement this modification.
Create a data-driven alert
1. Choose a continuous numeric axis from any chart, excluding Gantt charts or maps. (Numeric bins and discrete numeric axes are not compatible.)
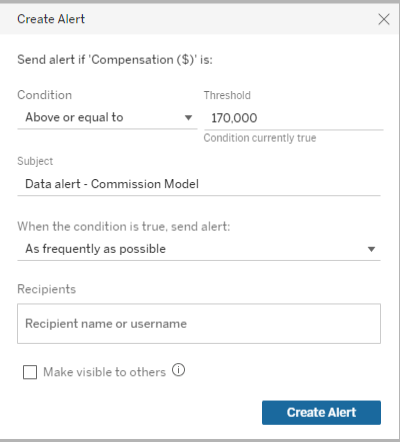
2. Click on the “Create” option located in the Alerts side panel.
3. Within the view, a visual representation in the form of a red line will indicate the position of the threshold in relation to your current data.

4. Specify the subject line, schedule, and recipients for the email notification. If you wish for other users to be able to view your alert and join it, select the option Make visible to others. For further details, refer to the instructions on how to add yourself to an existing data-driven alert.
5. Lastly, click on Create Alert to finalize the process.
Add yourself to an existing data-driven alert
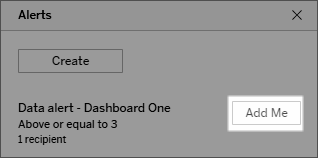
Any user who has access to a particular view can view alerts generated by other users. Simply select the desired alert to access its details, which include information such as the threshold, schedule, and frequency of notifications. If you wish to be included in the alert, simply click on Add Me to add yourself to the recipient list.

Manage your data-driven alerts
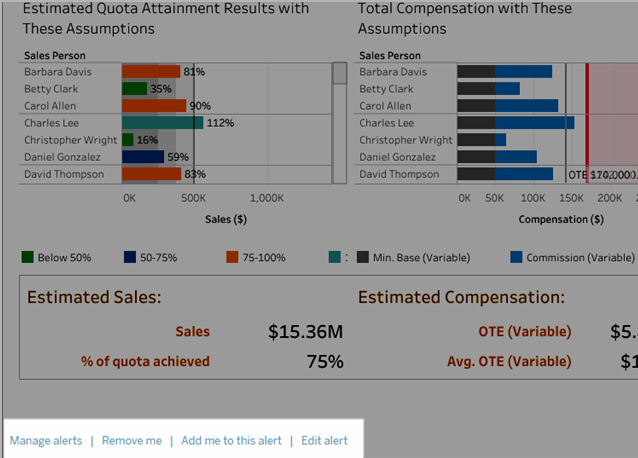
You have the option to handle alerts either through the My Content section of Tableau web pages or directly from the alert emails, which can be a faster approach. By clicking on the links provided below the image, you can efficiently manage all of your alerts, as well as add or remove yourself from the email notifications. If you are the owner of a specific alert, clicking on Edit this alert enables you to modify settings such as the threshold, schedule, and recipients of the alert.

As the owner of an alert, you have the ability to manage it conveniently through the Actions menu found in the Alerts side panel of the dashboard or view. This menu provides you with options to effectively handle and oversee the settings and configurations of your alert.
Manage your alert notifications
You have the flexibility to receive data-driven notifications through various channels, including email, your Tableau site, and a connected Slack workspace using the Tableau for Slack application. If you need further details on adjusting your notification settings or learning how to access Tableau notifications within Slack, please refer to the resources titled Change Notification Settings and See Tableau Notifications in Slack.
Fix failing data-driven alerts
Alerts may encounter occasional failures, typically due to the following reasons:
- Temporary connectivity issues: In such cases, the alert will automatically resolve itself once the connectivity is restored.
- Removal of a data source: If a data source associated with the alert has been removed, it can lead to failure.
- Expired credentials: If the credentials required to access the data have expired, the alert may fail.
- Removal of the workbook or sheet: If the workbook or sheet on which the alert was created is removed, the alert may no longer function.
In the event of an alert failure, you will receive a notification email specifying the failed alert, along with the exact time of failure and a link to your Tableau site to address the issue.
As the owner of the alert, you can resolve a failing alert by clicking on Edit this alert. This allows you to modify alert settings, such as the threshold, schedule, and recipients. Please note that a warning will appear if the workbook or sheet associated with the alert has been removed.
Once the issue is resolved, you will receive an email notification confirming that the alert is operational again.
Resume or delete suspended data-driven alerts
In the event of repeated failures, if an alert reaches a threshold of suspensions, you will be notified via email that the alert has been temporarily suspended. As an alert owner or administrator, there are several methods to resume a suspended alert:
- From the My Content section of Tableau web pages, you will notice an icon in the “Last checked” column indicating that the alert is currently suspended. To resume the alert, simply select the option “…”, then choose Resume Alert.
- Alternatively, if you receive a notification email regarding the suspended alert, you can click on the Resume Alert option provided within the email. Upon clicking, you will either be allowed to resume the alert successfully or be informed that the view has been altered, in which case the alert should be deleted.
Once the alert is operational again, you will receive an email notification confirming its resumption.
